Ok, you can see at the top, the broken shock tower (bolts were so bad had to cut them off). As well you can see when the shock tower broke it drove the shock into the frame, big dent in the upper bell.
bottom half shows refurbished shock tower from donor truck, rust treated and painted, and new replacement shock.
Here is the mounted shock tower with new shiny new bolts. It lined right up. Note: the bolts coming out were nearly 3.5" which is not a standard length. These are 3" and worked fine, I was still able to get lock washers on them and a full extension of the bolt through the nut.
All bolted up. with new shock in place before putting tire back on. I used a second jack under the front axle both for safety, and also to lift the axle to line up the bottom bolt for mounting. you can just see the black lift in the background.
this is my kind of fix. A $17 shock and a couple dollars in hardware. I replaced both shocks for good measure.
Monday, January 21, 2013
Sunday, January 20, 2013
13. Tackling the ceiling in cab. how much rust?
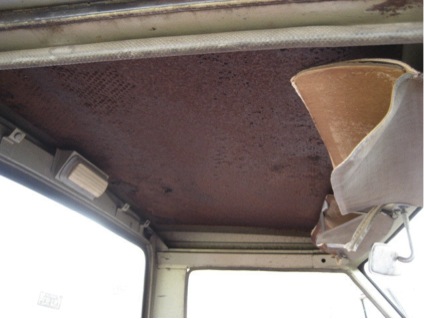
This is how the ceiling of the cab looked as we started on it. You can see some mix of rust and what is probably old flaking adhesive that held up the old ceiling panel. (oh and aged, sun baked, warped visors that are off now)My concern is the corners and inside edges if that is rust (and I don't like sanding above my head as all that junk rains down on me!)
Good news! As you can see on the right when I started sanding, most of what you saw was red adhesive and very little rust around the edges. Very happy about that.
A shot towards the rear, the cab dome light. Lots of bright, not rusty steel. as you get towards the edges I found some light surface rust (you can see a slight color change to red in the pic) but really in good shape. I treated with rust converter to be sure, in all the hard to see, reach crevices.
And... where we are today. treated, and primed with good coverage.
I got some sound deadening material online, enough to do the cab floor, back wall, ceiling, maybe the hood. If I can salvage the headliner from my donor truck, i will go get some material from a material store, some spray adhesive, and redo the headliner.
Then next steps are paint the ceiling brackets and frame, sound deadening roll, refinished headliner.
Tuesday, January 15, 2013
12. shock tower, POR15, Body bolt
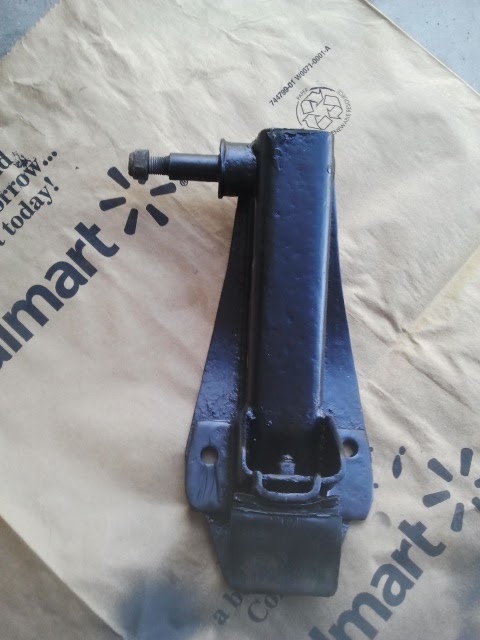
Some Odds and ends to keep moving things along. Somehow in driving the Gladiator home, I broke the front right shock tower (the bracket that holds the top of the shock absorber) which also dented heavily the shock itself. Seems from the forums that happens. So I cut the bolts off of the one on my donor truck, pried it off, ground down and treated the rust. Here it is prepped and painted to put on.
I can't say enough good about this POR 15 product. A 3 part system - a cleaner/degreaser, a "prep" solution (that converts surface rust), and the actual POR 15 paint. I had a pint, and it has done all the floor in the cab, and as you can see here, about 1/3rd of the truck bed flat section and still some left. It is really tough, body shop guys say it is a favorite for really dealing with rust.
I take a sander and angle grinder with a flap disk to get to bright steel and surface rust. I grind out cuts, dents, etc. Prep the heck out of the cuts and pitting that remain to convert any rust in crevices. You can see the truck bed in the foreground is done with POR 15 (I am using as a primer). You can contrast that with the front 2/3rds of the bed where I have only welded up holes so far, no treatment.
Finally, i noticed a missing body bolt that holds down the pick-up bed to the frame, so put one on.
I can't say enough good about this POR 15 product. A 3 part system - a cleaner/degreaser, a "prep" solution (that converts surface rust), and the actual POR 15 paint. I had a pint, and it has done all the floor in the cab, and as you can see here, about 1/3rd of the truck bed flat section and still some left. It is really tough, body shop guys say it is a favorite for really dealing with rust.
I take a sander and angle grinder with a flap disk to get to bright steel and surface rust. I grind out cuts, dents, etc. Prep the heck out of the cuts and pitting that remain to convert any rust in crevices. You can see the truck bed in the foreground is done with POR 15 (I am using as a primer). You can contrast that with the front 2/3rds of the bed where I have only welded up holes so far, no treatment.
Finally, i noticed a missing body bolt that holds down the pick-up bed to the frame, so put one on.
Thursday, January 10, 2013
11. Next on the list...
I have had the good fortune to acquire a donor truck (a '68) for a very good price. It has the 327 motor/trans set up (which I will sell), but in terms of door panels, windshield, windows, headliner, dash section, accelerator pedal, shock towers (I have a broken one), and a 100 other things, it is perfect.
1. replace the broken accelerator pedal mechanism (need to drill the new floor panel to mount)
2. Shim or just replace the upper driver side door hinge (pretty floppy, and I have a spare now)
3. Go through the brakes (the donor has fresh-ish drums and master cylinders on the front at least).
4. Install a missing hood latch pin
5. have done a section of the bed - (heavy sanding, rust conversion in pitting, then POR 15 treatment) on a 2'x2' section of the truck bed, that stuff is amazing and it came out great - will keep doing the bed in sections (sand, weld shut holes, grind and treat (just how much stuff did the PO have screwed and bolted down on that bed?)
1. replace the broken accelerator pedal mechanism (need to drill the new floor panel to mount)
2. Shim or just replace the upper driver side door hinge (pretty floppy, and I have a spare now)
3. Go through the brakes (the donor has fresh-ish drums and master cylinders on the front at least).
4. Install a missing hood latch pin
5. have done a section of the bed - (heavy sanding, rust conversion in pitting, then POR 15 treatment) on a 2'x2' section of the truck bed, that stuff is amazing and it came out great - will keep doing the bed in sections (sand, weld shut holes, grind and treat (just how much stuff did the PO have screwed and bolted down on that bed?)
- Still looking for a Buick 350 intake manifold to upgrade from my two barrel to a 4
- got to figure out how to adjust the 4WD shifter to keep it from banging on the transmission tunnel cover.
- I have a "1 ton" truck which is cool on one hand, but it also means I have two different bolt patterns between the front and rear wheels, hence two damn big spares when I am all done. Still thinking about that...
Tuesday, January 8, 2013
10. Goodie box and original radio
Here are the emblems refurbished.
It came with a full set in a box, but they were pretty faded and ugly. karine and I polished them, then took a Testors model painting kit and touched them up (it has the right orange, silver, and green, and off white colors for the jeep logos)
Then I cleaned and rigged up the old AM radio. It worked! as did the original speaker! bonus! setting aside for later... because someone cut a big hole in the dash for a more modern radio, got to fix that first.
refurbishing the emblems.
It came with a full set in a box, but they were pretty faded and ugly. karine and I polished them, then took a Testors model painting kit and touched them up (it has the right orange, silver, and green, and off white colors for the jeep logos)
Then I cleaned and rigged up the old AM radio. It worked! as did the original speaker! bonus! setting aside for later... because someone cut a big hole in the dash for a more modern radio, got to fix that first.
refurbishing the emblems.
9. One of the many mirror mounting spots
A mirror had been ripped off of the door in the distant past. I cut
around the rusty tear, and cut a filler panel (you can see the magnet
holding it in place) to weld in. It came out pretty well. There are
still a LOT of mirror holes to weld up.
8. too high with that big transmission hump in frame. Welded in 2 "S" shaped brackets to lower the center rails
You can see in this first pic I hoped to just cur the old frame to length, sit it on the frame, bolt it to the Jeep base, and go, but it sat way too high. This set up wouldn't fit under the steering wheel.
The Gladiators have a very high transmission hump that goes way up into the seat. But I wanted to keep the bottom of the frame so I could keep the seat adjustment mechanism and the original bolt up pattern...So... some more fabricating...
You can see I welded in two "S" brackets to the two center rails (the flatest looking pieces welded to the crossbar).
This lowered the seat 3 inches. This allows the side of the seat to sit on the frame, and the center of the seat to "down into" this frame, and just touch the transmission tunnel. I drilled and bolted up the front, and then back to the frame.
So, a nice seat with modern seat belts for $65. (Ok, in practice it STILL sits a bit high but not bad at all).
Here is what it looks like now in the cab. You can see how the seat sits into that frame front section now, on those two S brackets. Actually I was a 1/4 inch off, if you look closely you can see the seat actually touches the transmission hump and pushes up a little bit. But I need it as low as it can be so that works for me.
Subscribe to:
Posts (Atom)